Saturday, April 17, 2021

Upload Content Document with custom field populated from a Visualforce page

In a previous post, we looked at how to upload files as attachment without exceeding heap size governor limit. Link to post: https://blog.moothien.me/2017/05/upload-attachment-to-salesforce-without.html

However, most implementation nowadays make use of Content Document to store files since the Spring '16 rollout. 

Here I will show you how to upload file to Salesforce as Content Document attached to a record. At the same time, you will also be able to populate fields (standard and custom) on the Content Version record. 

First of all, let's take a look at the data model for Content Document. 


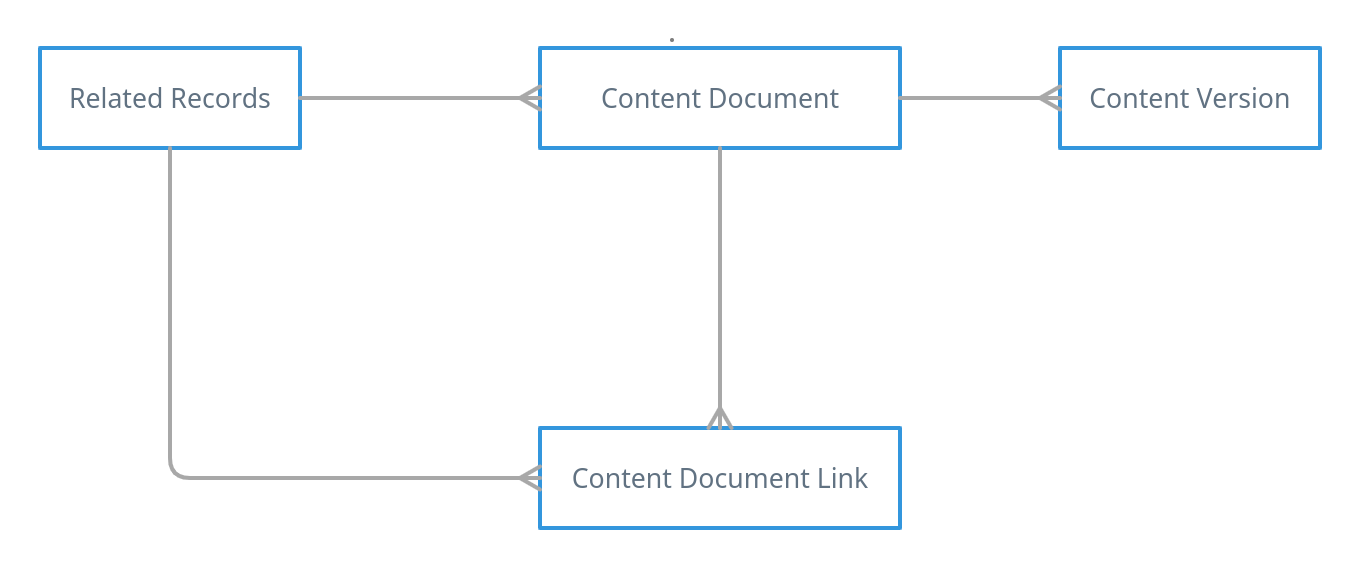
As you can see in the ERD above, the process of creating a Content Document is a bit different. The object Content Document cannot be created on its own, a Content Version needs to be uploaded first. This process will automatically create the Content Document. Now, to link the Content Document to the your record, a Content Document Link needs to be created which will store the relationship between your record and the uploaded file. 

This requires at least three APIs call to Upload: 

  1. upload a file will create a Content Version and will return the Id of the Content Version
  2. Use this Id to get the Content Document Id which has been auto created
  3. Use the Content Document Id and create a Content Document Link which relates to your record
Luckily for us, Salesforce has a special type of API request named Composite Resources which can execute Dependent Requests in a Single API Call. (Read more about Composite Resources here: https://developer.salesforce.com/docs/atlas.en-us.api_rest.meta/api_rest/using_composite_resources.htm)

Here is how the composite resource body is built and where to populate the custom field.


In the payload, you will notice a key referenceId. It will create a variable with this name and will be populated with the response of the current request, which can then be used to sub request.


Composite resource makes use of the following endpoint '/services/data/v51.0/composite'. A session Id is also required to authenticate the request. 

Here is the full code:


Demo

Upload a file with custom attributes


The result on Salesforce


Resources:


Saturday, March 27, 2021

Einstein Vision - Image Classification Open Source App

“According to Gartner, by 2020, 85% of customer interactions in the retail industry will be managed by AI."

Last year, I have written post about the OCR module of Einstein Vision, but did you know that other modules exist? Such as Image Classification and Object Detection

In this blog post, I will talk about Einstein Vision Image Classification module. But wait, what is image classification, How does it works, where can I use it and how to implement it? I shall try to answer each one of them.

What is Image Classification?

Image classification in computer vision refers to a process that can classify an image according to its visual content. In Einstein Vision, you will be the one who will feed the images and for each image, you will also provide a label. It will process the images and try to identify one type of object in each image and assign the label. 

How does it works?

For you to be able to use a Image Classification software (an AI is used), you will need a dataset. This is where you will gather several photos of an object and feed the software by telling it what is in the photo using a label. 

Once you have sufficient photos and labels in your dataset, you just have to train it (don't worry, the software will perform this for you). The output is called a model

It is against the model that prediction of an image is performed. 

Where can it be used?

An example would be at an automatic Grocery store where user displays the product in front of a camera at checkout. The camera takes a picture of the product and then using Image classification software, it looks up from its trained dataset (model) to predict the product shown and retrieved relevant information such as label and price. 

How to implement EV Image Classification?

To implement this module, you have several options: 

Einstein Vision App

I will showcase the last option, which is a desktop application that I have implemented from scratch from my experience with Einstein Vision Image Classification. 

Hang tight, thing are getting technical here.

First of all, it is an hybrid application developed on the Nodejs and Electron framework. Meaning, it will work on Linux, Windows and Mac.


I haven't published an executable version of the Application yet. So, you will have to build it by yourself. But don't worry, it isn't difficult at all (Instruction can also be found in the README.md file on the Github repository). 

Here are what you need to get started (and as a developer, I believe you have all of them): 
  • git
  • nodejs

Simply clone the repositoy locally using the following command line: 
git clone https://github.com/kevanmoothien/einstein-app.git
Open your favorite terminal inside the einstein-app directory.

Install dependencies with npm:
npm install
Last, start the application:
npm start
Once the application starts, you will need to insert your Einstein Vision credentials. It is composed of an email address and a einstein_platform.pem file. Insert the email address and open the einstein_platform.pem file using your favorite text editor. Copy the content and paste it in the Einstein App. Sign up here if not already done: https://api.einstein.ai/signup

Configure einstein api
Einstein Credential configuration

You can now start creating projects for  classifying images. 

Let's create a new project name boardgame


Add a label and start uploading images for this label. 

Uploading images for label monopoly


Once you have uploaded images for several labels (minimum 2 labels are required). You can Create a Dataset. When the dataset is created, it will upload all the images. You will see a green icon on each image which has been processed. There is also a progress bar. 

Example Create Dataset


When upload has been completed. Click on View Dataset for this project. It will show you the status of the dataset which has been uploaded. From there, you will have a button Train Dataset. Clicking on it will create a model. Then click on View Model 

Dataset status and Training


You will see Einstein Model progression. Once succeeded, you can proceed and test your model. Upload an image you want to predict, it will output the probabilities. In the example below, I have tested it against a monopoly image.

Playground prediction


Demo


Resources: