Showing posts with label salesforce. Show all posts

Saturday, April 17, 2021

Upload Content Document with custom field populated from a Visualforce page

In a previous post, we looked at how to upload files as attachment without exceeding heap size governor limit. Link to post: https://blog.moothien.me/2017/05/upload-attachment-to-salesforce-without.html

However, most implementation nowadays make use of Content Document to store files since the Spring '16 rollout. 

Here I will show you how to upload file to Salesforce as Content Document attached to a record. At the same time, you will also be able to populate fields (standard and custom) on the Content Version record. 

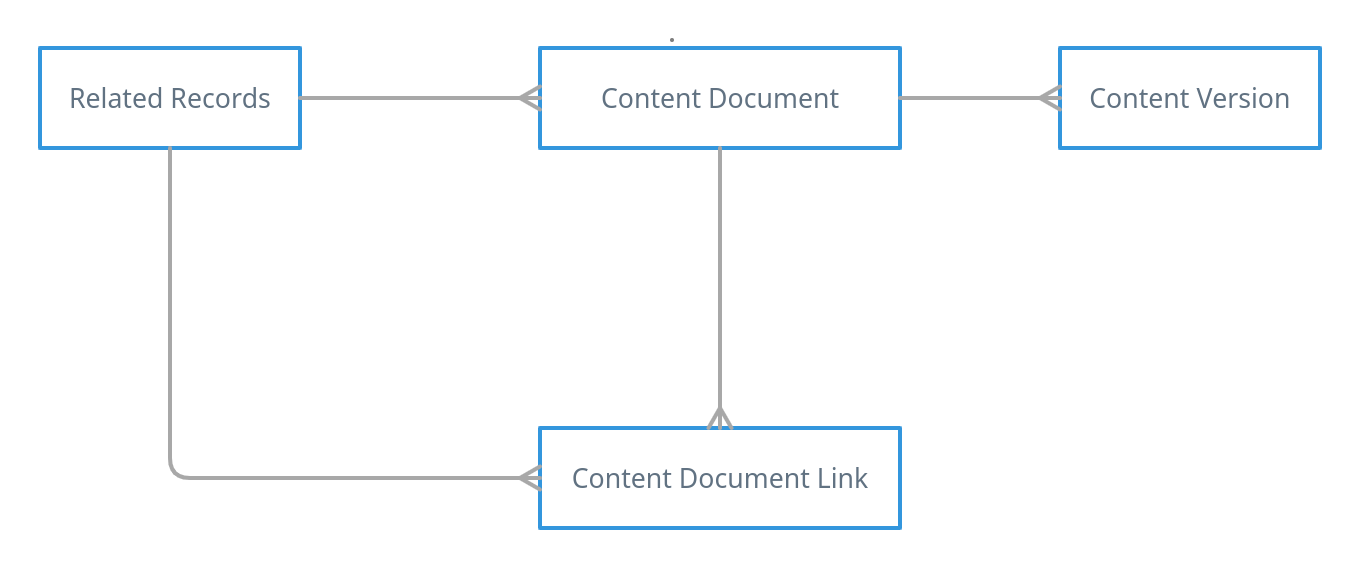
First of all, let's take a look at the data model for Content Document. 


As you can see in the ERD above, the process of creating a Content Document is a bit different. The object Content Document cannot be created on its own, a Content Version needs to be uploaded first. This process will automatically create the Content Document. Now, to link the Content Document to the your record, a Content Document Link needs to be created which will store the relationship between your record and the uploaded file. 

This requires at least three APIs call to Upload: 

  1. upload a file will create a Content Version and will return the Id of the Content Version
  2. Use this Id to get the Content Document Id which has been auto created
  3. Use the Content Document Id and create a Content Document Link which relates to your record
Luckily for us, Salesforce has a special type of API request named Composite Resources which can execute Dependent Requests in a Single API Call. (Read more about Composite Resources here: https://developer.salesforce.com/docs/atlas.en-us.api_rest.meta/api_rest/using_composite_resources.htm)

Here is how the composite resource body is built and where to populate the custom field.


In the payload, you will notice a key referenceId. It will create a variable with this name and will be populated with the response of the current request, which can then be used to sub request.


Composite resource makes use of the following endpoint '/services/data/v51.0/composite'. A session Id is also required to authenticate the request. 

Here is the full code:


Demo

Upload a file with custom attributes


The result on Salesforce


Resources:


Thursday, October 29, 2020

Getting Started with Salesforce Einstein Vision OCR (tabular model) - Part 2

In the previous Einstein Vision OCR blog post, we took a look at setting up Einstein Vision and viewed a sample usage with Business card. Click here if you missed it. 

In this post, we shall see the other version of the OCR which is reading tabular format image. E.g Balance sheet, excel screen capture, inventory list, etc...

Official Einstein Vision Tabular documentation here: https://metamind.readme.io/docs/detect-text-and-tables

I have created a sample code which will call the tabular model and from the predicted result, I built a html table which is being displayed right away in your Salesforce.

Demo screenshot


Here is a demo video:


Technical details about the prediction result: 

  • the recognized label will contain a cellLocation with rowIndex and colIndex. 
  • use the rowIndex and colIndex to map it on a two dimensional array 
  • then build the html table with tr and td
    • tr - for each row
    • td - for each column

Here are some use cases where it can be useful:
  • You need to digitalize all paper work tabular transaction, just scan it and let Einstein do the rest.
  • scan you sheets and display form for a data entry to validate and correct where necessary. This will save time during data entry


In the next post, we shall talk about the Einstein Vision Retail Execution API. Stay tuned.

Cheers..


Saturday, March 9, 2019

Converting a DateTime field into a Unix Timestamp with formula field

In this episode, we will show you have you can easily convert a date time field value to an Epoch/Unix Timestamp using Salesforce formula field.

First, you need a field of type DateTime such as CreatedDate, LastModifiedDate or any Custom Field.

In our example, we will use the CreatedDate Field. The formula is as below.

(CreatedDate - DATETIMEVALUE( "1970-01-01 00:00:00" )) * 86400


This can be used to append to a image url to prevent image cache from browser.

Monday, December 3, 2018

Mock HTTP callouts in a Managed Package


In this blog, I will show you how to mock callout response which is in a managed package.


I found out that many developers are using Test.IsRunningTest() in their Apex classes to avoid writing Mock responses for http callouts and if the callout comes from a Managed Package, they are stuck with this message "Methods defined as TestMethod do not support Web service callouts".

As per Salesforce Documentation, "To mock a callout if the code that performs the callout is in a managed package, call Test.setMock from a test method in the same package with the same namespace."

So to be able to mock callout which is performed in a managed package, the line doing "Test.setMock" should be called from the managed package itself.

So what we did in the SharinPix (ISV) managed package, we added a global class which take a HttpCalloutMock class as parameter and execute the Test.setMock from within the package.

@isTest
global class HttpCalloutSimulator {
    global static void setMock(HttpCalloutMock mock) {
        Test.setMock(HttpCalloutMock.class, mock);
    }
}

By adding the above class in your package and making it global so that it ca be called outside the managed package make it easy to mock code which are doing callout in your package without getting error messages.

You will just need to call it as below:

[namespace].HttpCalloutSimulator.setMock(mock);

Example on how to use it:

sharinpix.HttpCalloutSimulator.setMock(HttpCalloutMock mock);  
//where the variable mock is the instance of your HttpCalloutMock class

Links: 

Saturday, December 1, 2018

What is Remote Action in Salesforce?

In this blog, we will learn how to use Remote Actions in Visualforce Page.

But what is a Remote Action? 


Remote Action is a way to access Apex method using Javascript in your Visualforce page.
It allows you to create pages with complex, dynamic behavior that isn’t possible with the standard Visualforce AJAX components.

Remote action method should always have the @RemoteAction annotation and it should be Static.

Let's take an example where we need to retrieve the first five Cases with Status to New.


Output:

Point to remember:

  • @RemoteAction annotation is mandatory
  • Remote Action methods should always be static
  • If you are using the Visualforce Page inline in a Page Layout, then the method should be declared as global instead of public

Friday, February 16, 2018

Visualforce renderAs pdf in different page format


Over the years, I found that there are so many people struggling with rendering pdf using visualforce, specially when they are required to set a custom page size, page break, margin, adding custom styling.

Today I shall give an example on how to print a contact address on an envelope using a pdf generated from a pdf upon the click of a button from the page layout.

First of all, to be able to generate a pdf from a Visualforce page, you need to use the renderAs attribute on the apex:page tag. See code below:


The above code will generate a pdf but you will notice that the page size will be in an A4 or letter document format. We want to achieve an envelope page size as mentioned early. This can be easily be achieved using some css in the code.

The following attribute are required on the apex:page tag: applyHtmlTag="false" and showHeader="false". To specify a size for the rendered pdf, the following style need to be added to the page:

<style>
@page {
    size: 6.4in 4.5in;
}
</style>

The size is customizable depending on the desired print layout:
  • size: A4;
  • size: A5 landscape;
  • size: 9in 5in;
When the @page is not specified, a full document format pdf is created. 
When no size specified (default to A4)

Now with a size specified.
Envelope size (6.4in x 4.5in)
Here is the full code for the above output.


Additional and helpful resources:

Enjoy ;)

Tuesday, November 28, 2017

Customize Salesforce App Navigation Menu to have SObject item on Top

Salesforce mobile App, formerly known as Salesforce1, provides you with limited options regarding customization of the menu item. You can only add the following items:
  • Salesforce productivity items such as Dashboards, Reports, Tasks, ...
  • Smarch Search Items
  • Visualforce tabs
  • Lightning Page tabs
The rest of the menu depends on the tabs you are allowed to interact and view on your Salesforce. Most of them would be Standard and Custom objects. And according to what Application you have opened, the mobile app will have the same menu.


But sometimes we would like some of our Object menu to be on top in the main menu instead in the recent section. Also to be able to interact as if it was the standard view.
This can easily be done with a few lines of code and some configuration. For this example, we shall use the Opportunity object.

First, we need to create a Lightning Component. We shall name it "OpportunityMenu". Below are the code needed. Change the "scope" according to the SObject you want.

Now we need to add a new Lightning Component Tab.

Once the custom tab has been created, we can configure the Salesforce mobile Navigation menu and add the Opportunity menu.

Reload your Salesforce App and voila..


Standard Listview layout appears

Additional Resources:
({ navHome : function (component, event, helper) { var homeEvent = $A.get("e.force:navigateToObjectHome"); homeEvent.setParams({ "scope": "Opportunity" }); <aura:component implements="force:appHostable"> <aura:dependency resource="markup://force:navigateToSObject" type="EVENT"/> <aura:handler name="init" value="{!this}" action="{!c.navHome}"/> </aura:component>

Wednesday, November 22, 2017

Uploading multiple files with the Salesforce Lightning file upload Component (Winter 18)

Salesforce has recently released the lightning:fileUpload component which is basically a file uploader for uploading and attaching files to records.

The provides an easy and integrated way for users to upload multiple files. The file uploader includes drag-and-drop functionality and filtering by file types.

For now, it is available only in beta. It will prevent us from writing complex code and as such, does not come with limitations such as heap sizes, problems with assigning permissions to custom devs.

Here are some preview of the component: 
lightning:fileUpload component layout


You can deploy the component to your Salesforce by clicking on the button below:


And source code is available at: https://github.com/kevanmoothien/lightning-file-uploader


Unfortunately, it only uploads files and for those who still want to use attachment, here is one of my previous blog on how it can be achieved. 

Saturday, November 18, 2017

Rendering Visualforce pages with Lightning Experience Stylesheets

winter-18-logoWith the latest release (Winter 18) of Salesforce, a new feature has been added to help style a Visualforce page to Lightning Design with only a single attribute to add on the apex:page xml tag. It will only be viewable under Lightning Experience or on the Salesforce app (formerly known as Salesforce1). If viewed on Salesforce Classic, the styling won't work.

Add the attribute LightningStylesheet and Salesforce get the work done for you.

Here is a sample page I made to illustrate the changes in Salesforce Classic and Lightning Experience.

Salesforce Classic 

Lightning Experience
Salesforce Classic with Inputs

Lightning Experience with Inputs

Note:

  • This is a beta version of the feature. It is still under development by the Salesforce team. 
  • You can also use the apex:slds tag for creating custom component
  • It is only available in the Winter 18 api (41). You will have this error with older api version: "Unsupported attribute lightningstylesheets in <apex:page>"

Additional Resources:
https://developer.salesforce.com/docs/atlas.en-us.pages.meta/pages/vf_dev_best_practices_slds_lightningstylesheets.htm


Tuesday, May 16, 2017

Automatic package license assignment to Users

We have been asked by one of our customer at SharinPix if it was possible to assign Licenses to newly created user automatically and removing the license on user upon deactivation. The solution that I was asked to do was a trigger. But this solution requires coding which will require a test class, changeset for deployment, giving user permission to execute the trigger which it quite a lot to do. In case something is wrong with the trigger, we will be required to modify on the customer sandbox and deploying again, which is kind of tedious. 

But recently I did a module on Trailhead about Process Automation which explain how to achieve complex logic without having the need to write a single piece of Apex Code. It is only by configuring Flows and Process Builders. 

Here is the solution for the above requirement

The following objects will be used to automate assigning user license: 

Below are the steps to create a Flow and Process Builder.

Flow


1. Go to Setup, Search Flows from the Quick Find textbox
2. Click on New Flow, the Flow Designer will open. 
On the left sidebar, click on the tab Resources. Create two variables var_UserId of type text and var_isNew which will store the package license id and the user id. See screenshot below. 

Variable User Id

Variable IsNew
Create a third variable of type SObject variable. Name is SharinPixLicense and Object Type is PackageLicense.

SharinPix License sobject variable

3. We now need to retrieve the Id of the license for the SharinPix package. Drag and drop a Record Lookup element to the canvas. Enter a name and insert the following properties: 
  • Look up: PackageLicense
  • Field: NamespacePrefix, Operator: 'equals', Value: 'sharinpix' (The namespace prefix of the package: Setup | Build | Installed Packages)
  • Variable assignment 
    • Field: Id, Variable: '{!SharinPixLicense.Id}'
    • Field: AllowedLicenses, Variable: '{!SharinPixLicense.AllowedLicenses}'
    • Field: UsedLicenses, Variable: '{!SharinPixLicense.UsedLicenses}'


4. Drag and drop the Record Create element to the canvas. Enter a name and insert the following properties: 
  • Create: UserPackageLicense
  • Field: PackageLicenseId, Value: {!SharinPixLicense.Id}
  • Field: UserId, Value: {!var_UserId} 
Assign license to user


Now that we have the create record, we now need to have the delete license equivalent

5. Drag and drop the Record Delete element. Enter a name and the following properties
  • Delete: UserPackageLicense
  • Field: UserId, Value: {!var_UserId} 
  • Field: PackageLicenseId, Value: {!SharinPixLicense.Id}
Remove license from user

6. Let's create the logic and assemble all the component. 
Drag and drop the Decision element on the canvas. Enter a name and create two outcomes
  • Outcome 1 
    • Name: Created
    • Resource: {!var_isNew}, Operator: equals, Value: {!$GlobalConstant.True}
    • Resource: {!SharinPixLicense.UsedLicenses}, Operator: less than, Value: {!SharinPixLicense.AllowedLicenses}
Note: I have added the condition that Used licenses should be less than Allowed Licenses in order for the flow not to crash if all licenses have been used. 
  • Outcome 2
    • Name: Deleted
    • Resource: {!var_isNew}, Operator: equals, Value: {!$GlobalConstant.False}


7. Link the component same as in the image below and set the Record Lookup as the start of the flow (click on the green arrow icon)
Wrap everything

8. Save your Flow with a name, select type Autolaunched Flow and activate it once done. 
Save flow

Process Builder


Now that our flow is completed. We need to trigger the flow and we will use a process builder to do that.

1. Go to Setup | App Setup | Create | Workflows & Approvals | Process Builder
Click on the New button, Enter the Process Name and API Name and click on Save button.
New Process

2. We need to trigger the process on a specific Object. For this, click on Add Object and in the properties, select User and select when a record is created or edited. Click on Save.
Entry criteria

3. Next step is to add the Process Criterias. In our case, we will have two criteria. One will cater for new user and the other one for user which has been deactivated.
  • Let's create the first one. Click on Add Criteria
    • Criteria Name: User is active
    • Select Formula evaluates to true
    • In the formula field, insert the following formula
      • ( ISNEW() && [User].IsActive ) || ( ISCHANGED([User].IsActive) &&  [User].IsActive )
Save the criteria
New user active or update a user to active

  • Let's create the first one. Click on Add Criteria
    • Criteria Name: User is not active
    • Select Formula evaluates to true
    • In the formula field, insert the following formula
      • ( ISCHANGED([User].IsActive) && NOT( [User].IsActive ))
Save the criteria 


4. Now we add the actions for each criteria. 
For the User is active criteria. In the Intermediate Action section, click Add Action with the following properties:
  • Action Type: Flows
  • Action name: Create License
  • Flow: Automatic Package License assignment (Yours may be under a different name)
  • Set Flow Variables
    • Flow Variable: var_UserId, Type: Reference, Value: [User].Id
    • Flow Variable: var_isNew, Type: Boolean, Value: True

5. Let's repeat step 4 for the User is not active criteria. Change the Action Name to Delete License and set the flow variable var_isNew to False.

Your process builder should look like below. 
Finally, Click on Activate to enable it. 


Every new user shall be affected a License to the package and user being deactivated will have their license removed. 

Do not hesitate to contact me in case something is missing or needs improvements. 

Cheers :)